
Building your own DIY modular campervan is one of the most rewarding ways to create a fully customised travel experience. Whether you’re planning weekend adventures or long-term van life, a modular campervan gives you flexibility, efficiency, and cost savings. Unlike fixed conversions, modular designs allow you to reconfigure your layout, remove furniture when not needed, and upgrade components over time.
In this detailed guide, we’ll cover everything you need to know about converting a van into a modular camper in the UK, including legal considerations, choosing the right van, insulation, electrical setup, furniture, and practical tips for budget-friendly builds.
Modular Campervan vs Modular Motorhome — What’s the Difference?
If you’ve been searching for a modular motorhome and landed here, you’re in the right place — you just may not have known it yet.
The terms modular motorhome and modular campervan are often used interchangeably, and for good reason: they describe the same core concept. A modular motorhome typically refers to a larger vehicle — a Fiat Ducato base, a Volkswagen Crafter, or a Mercedes Sprinter — fitted with a removable, reconfigurable interior rather than a permanently built-out conversion. That’s exactly what a modular campervan is.
The practical difference comes down to vehicle size and use case:
| Modular Motorhome | Modular Campervan | |
|---|---|---|
| Typical base vehicle | Sprinter LWB, Crafter, Ducato | Transit, Sprinter MWB, Master |
| Primary appeal | More living space, stand-up height | Easier to drive and park daily |
| Modular system | Same — removable pods, track-mount, fold-flat | Same approach, smaller scale |
| UK registration | Can qualify as motor caravan (DVLA) | Can qualify as motor caravan (DVLA) |
| Common use | Part-time van life, weekend trips | Work van by week, camper by weekend |
Whether you’re building a modular motorhome or a modular campervan, the build principles in this guide apply equally. The sections on electrical systems, modular furniture, water setups, and legal considerations are all relevant regardless of which vehicle you’re starting with.
💡 Tip: Searching “modular motorhome furniture” or “modular campervan furniture” will return very similar results — the market for pre-built modular pods like Vangear, Vancubic, and Outback has grown significantly and most systems fit a range of van sizes.
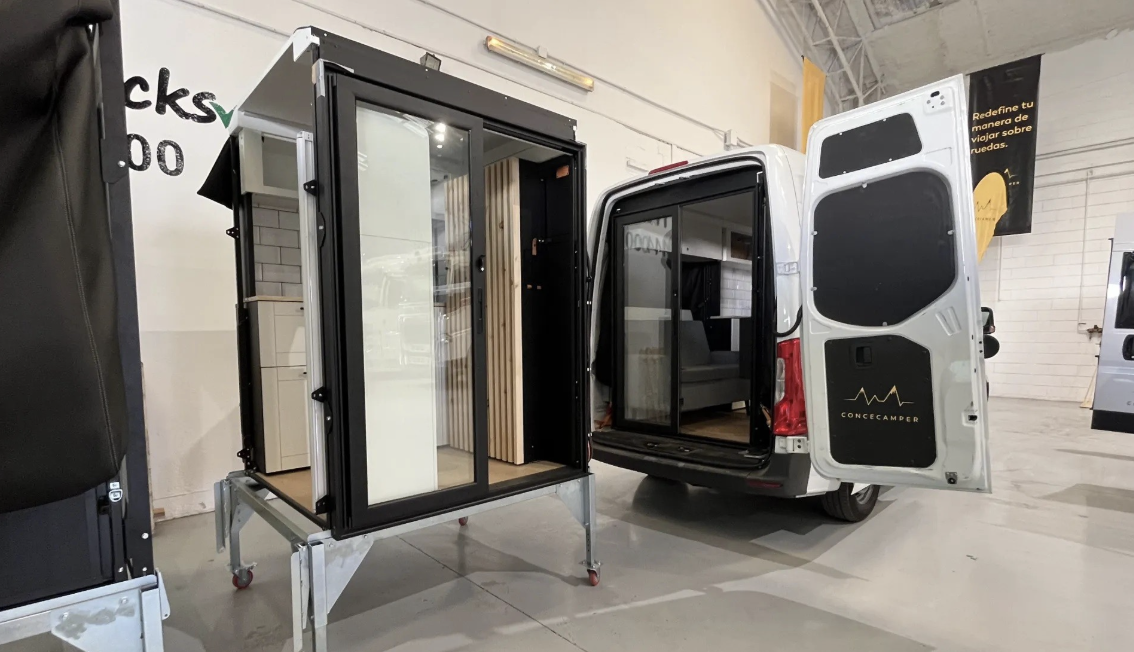
How Modularity Facilitates Multi-Use: A Work Van by Week, Camper by Weekend
One of the biggest advantages of a modular campervan is its ability to serve multiple purposes. Instead of committing your van solely to camping, a modular system allows you to switch between work and leisure modes effortlessly.
For example, during the working week, your van can function as a builder’s van, a delivery vehicle, or a mobile workshop. Then, come the weekend, you simply slot in your pre-built modular camping setup, transforming it into a comfortable camper for adventure.
Modular conversions are ideal for people who need their van for work but also want to enjoy weekend trips without a permanent setup.
How a Modular System Enables Multi-Use
- Quick Installation & Removal – Modular units can be secured with quick-release fasteners, allowing them to be removed in minutes.
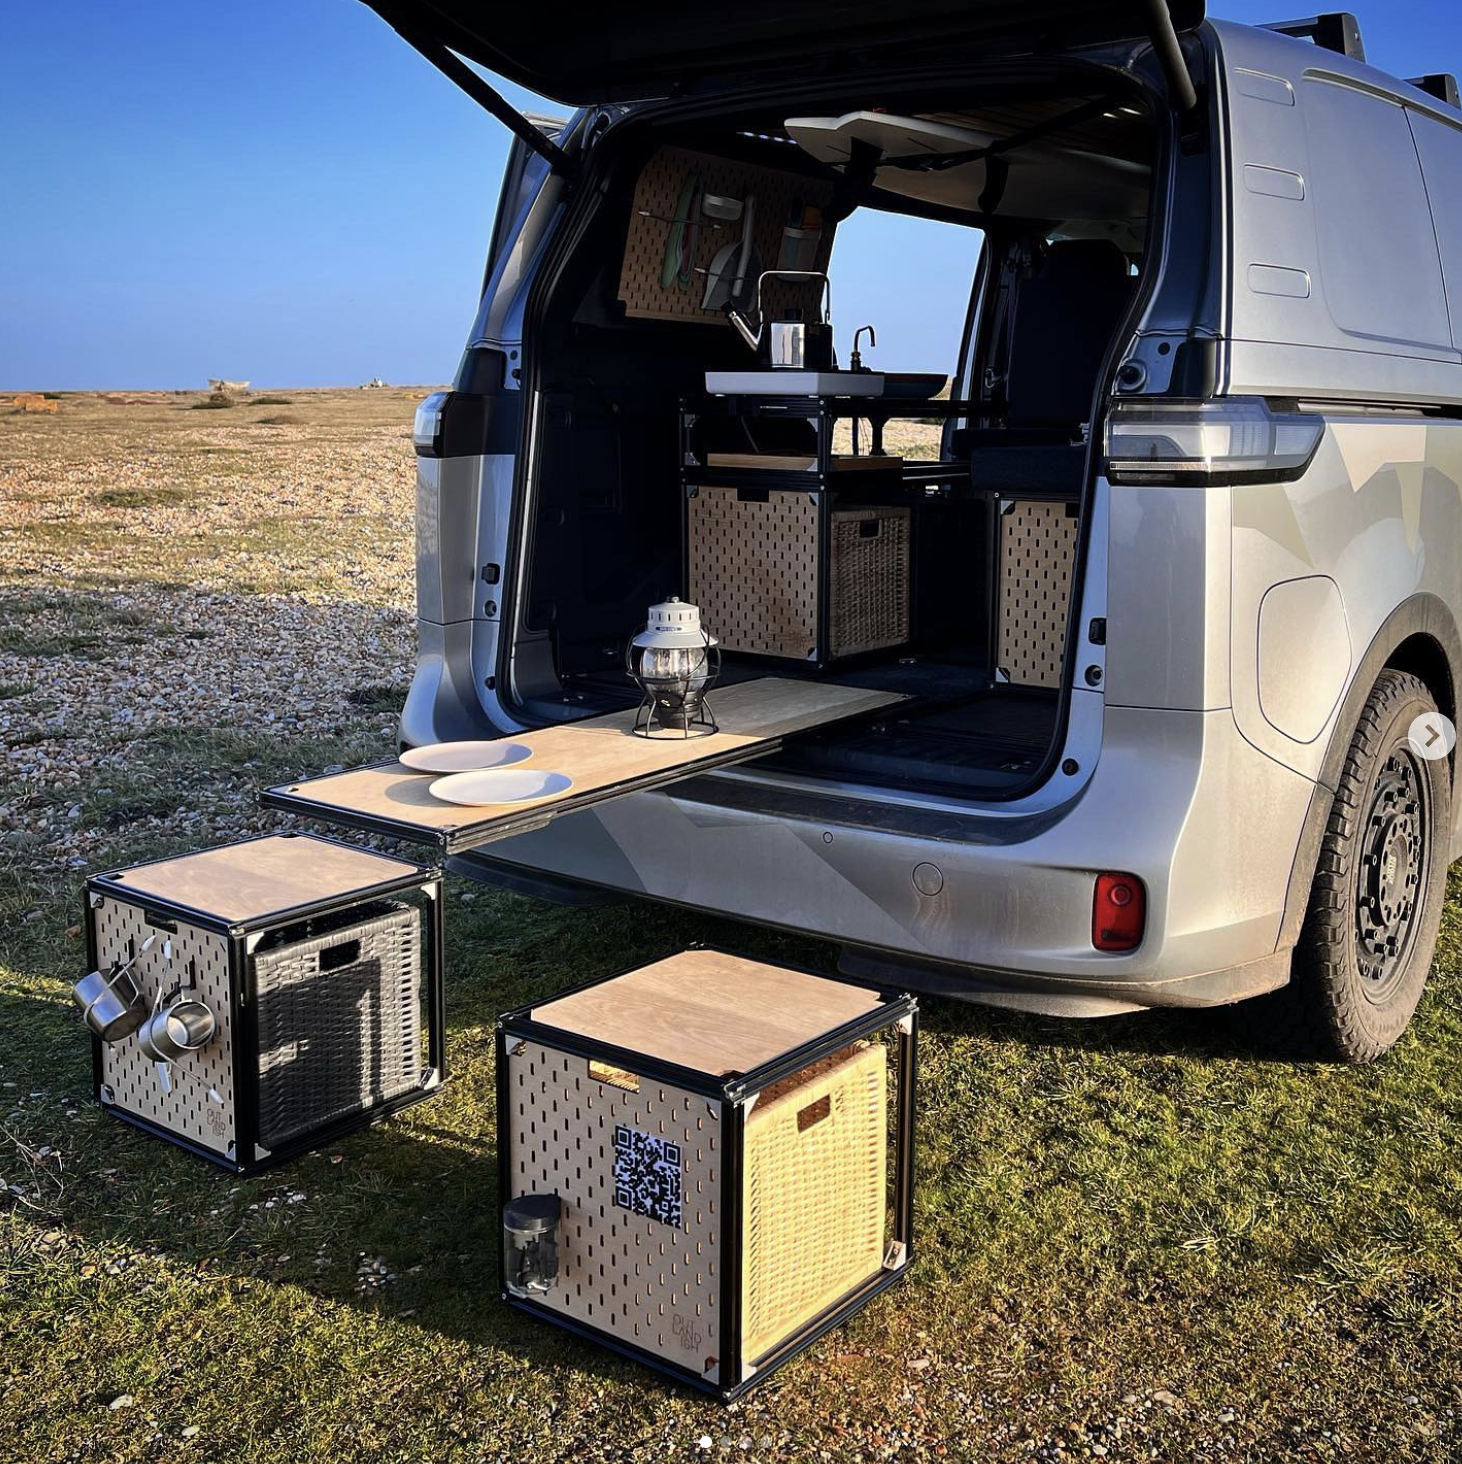
- Stackable Storage Boxes – Heavy-duty storage boxes can serve as tool compartments during the week and camping cupboards on weekends.
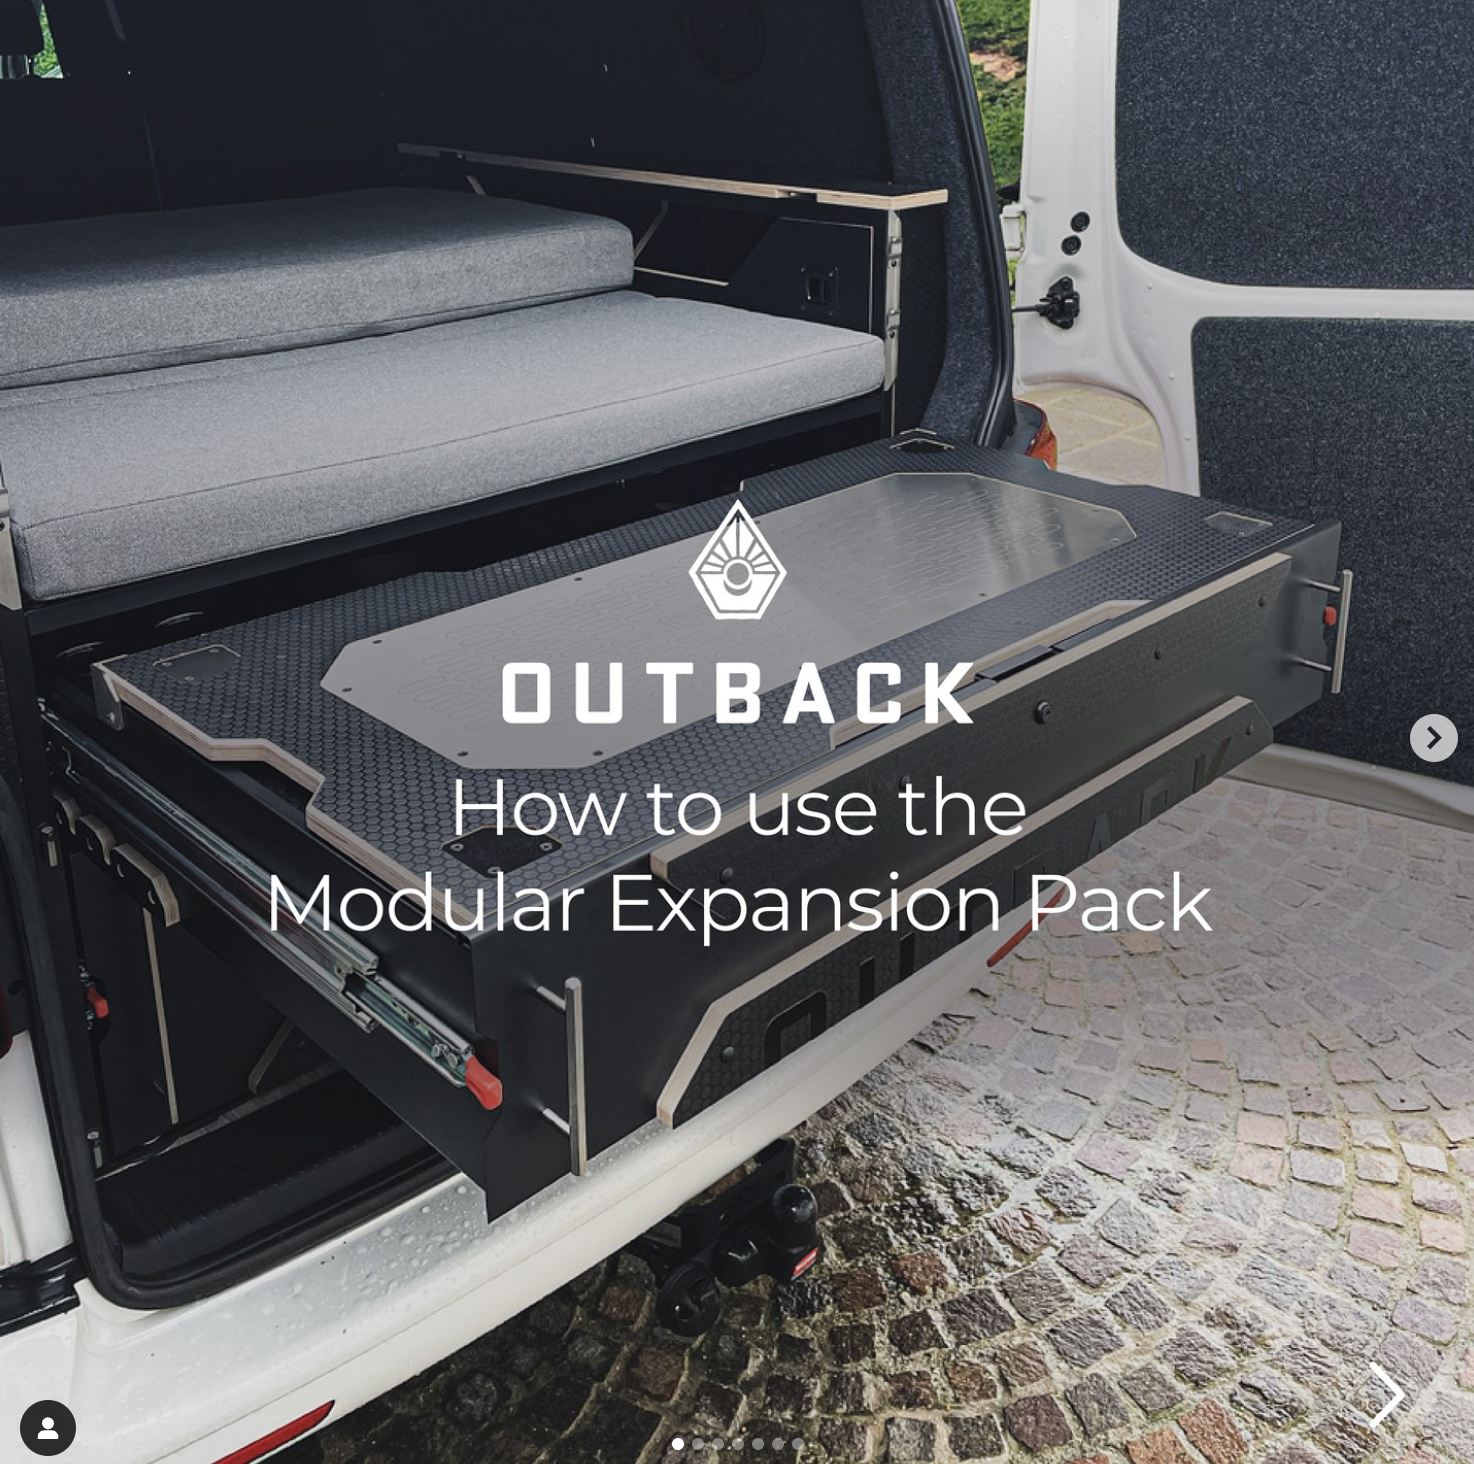
- Foldable or Slide-Out Furniture – Fold-down beds or seating can be stored away during the workweek.
- Kitchen Pods & Removable Appliances – A detachable kitchen unit means your van remains clear when not in use for camping.
- Track-Mounted Systems – Some builders install aluminium L-track rails to secure both work tools and camper components without drilling multiple holes.
Example: A Builder’s Modular Camper Setup
🛠 Monday – Friday:
- Van is empty except for tool storage racks and work materials.
- A fold-up workbench is attached inside.
- Floor space remains open for cargo or heavy items.
🏕 Friday Night – Sunday:
- Tool racks are removed, and modular bed/storage units are slotted in.
- A removable kitchen pod is secured in place.
- A modular battery pack and solar panel system provide off-grid power.
By using a modular system, you don’t need two separate vehicles – just one van that adapts to your needs on demand.
Here’s the How-To list summary:
- Choosing the Right Van for Your Modular Conversion
Before you start your build, you need to select a van that meets your needs. Consider factors such as size, budget, fuel efficiency, reliability, and ease of conversion.
- Planning Your Modular Campervan Layout
Unlike fixed conversions, a modular campervan allows you to change your setup based on your needs. You can remove sections, store furniture when not in use, or rearrange your living space.
- Insulating Your Modular Campervan
The goal is to control three things: heat retention, condensation, and sound. In the UK climate, all three matter.
- Modular Electrical, Water & Gas Systems: Simplifying Setup & Flexibility
Many people worry that electrical, water, and gas systems are too complex for a modular camper build. However, with the right quick-connect systems and portable components, it’s easier than ever to make them semi-fixed or fully removable.
- Installing the Electrical System
A reliable electrical system powers your lights, fridge, charging ports, and appliances.
- Plumbing & Water Systems
A simple modular water system allows for easy removal and winter storage.
- Building Modular Furniture & Storage
The key to a modular campervan is removable and multi-functional furniture.
- How Much Does a DIY Modular Campervan Conversion Cost?
The honest answer is that it varies widely — but a modular build has some genuine cost advantages over a fixed conversion that are worth understanding.
- Legal Considerations & Insurance in the UK
To register your campervan with the DVLA, it must meet specific requirements.
1. Choosing the Right Van for Your Modular Conversion
Before you start your build, you need to select a van that meets your needs. Consider factors such as size, budget, fuel efficiency, reliability, and ease of conversion.
Best Vans for Modular Conversions in the UK
| Van Model | Pros | Cons |
|---|---|---|
| Ford Transit (LWB & MWB) | Affordable, widely available, reliable | Some older models have rust issues |
| Mercedes Sprinter | High build quality, durable, good resale value | Expensive, costly repairs |
| VW Crafter | Spacious, efficient, good for full-time van life | More expensive than similar-sized vans |
| Renault Master | Budget-friendly, decent headroom, easy to work on | Lower resale value |
| Peugeot Boxer / Citroën Relay | Boxy shape (ideal for modular builds), fuel-efficient | Interior trim can feel basic |
| Vauxhall Movano | Good for DIY, spacious, affordable | Not as common, harder to find parts |
Things to Consider Before Buying
✅ Size – Short wheelbase (SWB) for city driving, long wheelbase (LWB) for more space
✅ Mileage & Condition – Look for service history, minimal rust, and low mileage
✅ Height – High-roof vans are better for standing space
✅ Insurance & Road Tax – Campervan classification can lower insurance premiums
💡 Tip: Before committing to a purchase, check van dimensions against your planned layout!
2. Planning Your Modular Campervan Layout
Unlike fixed conversions, a modular campervan allows you to change your setup based on your needs. You can remove sections, store furniture when not in use, or rearrange your living space.
Popular Modular Layout Styles
🔹 Fixed Bed Layout – Ideal for full-time van life, but takes up permanent space
🔹 Convertible Bed/Dining Area – Best for small vans; bed converts into a seating area
🔹 Pull-Out or Folding Bed – Saves space; works well in SWB vans
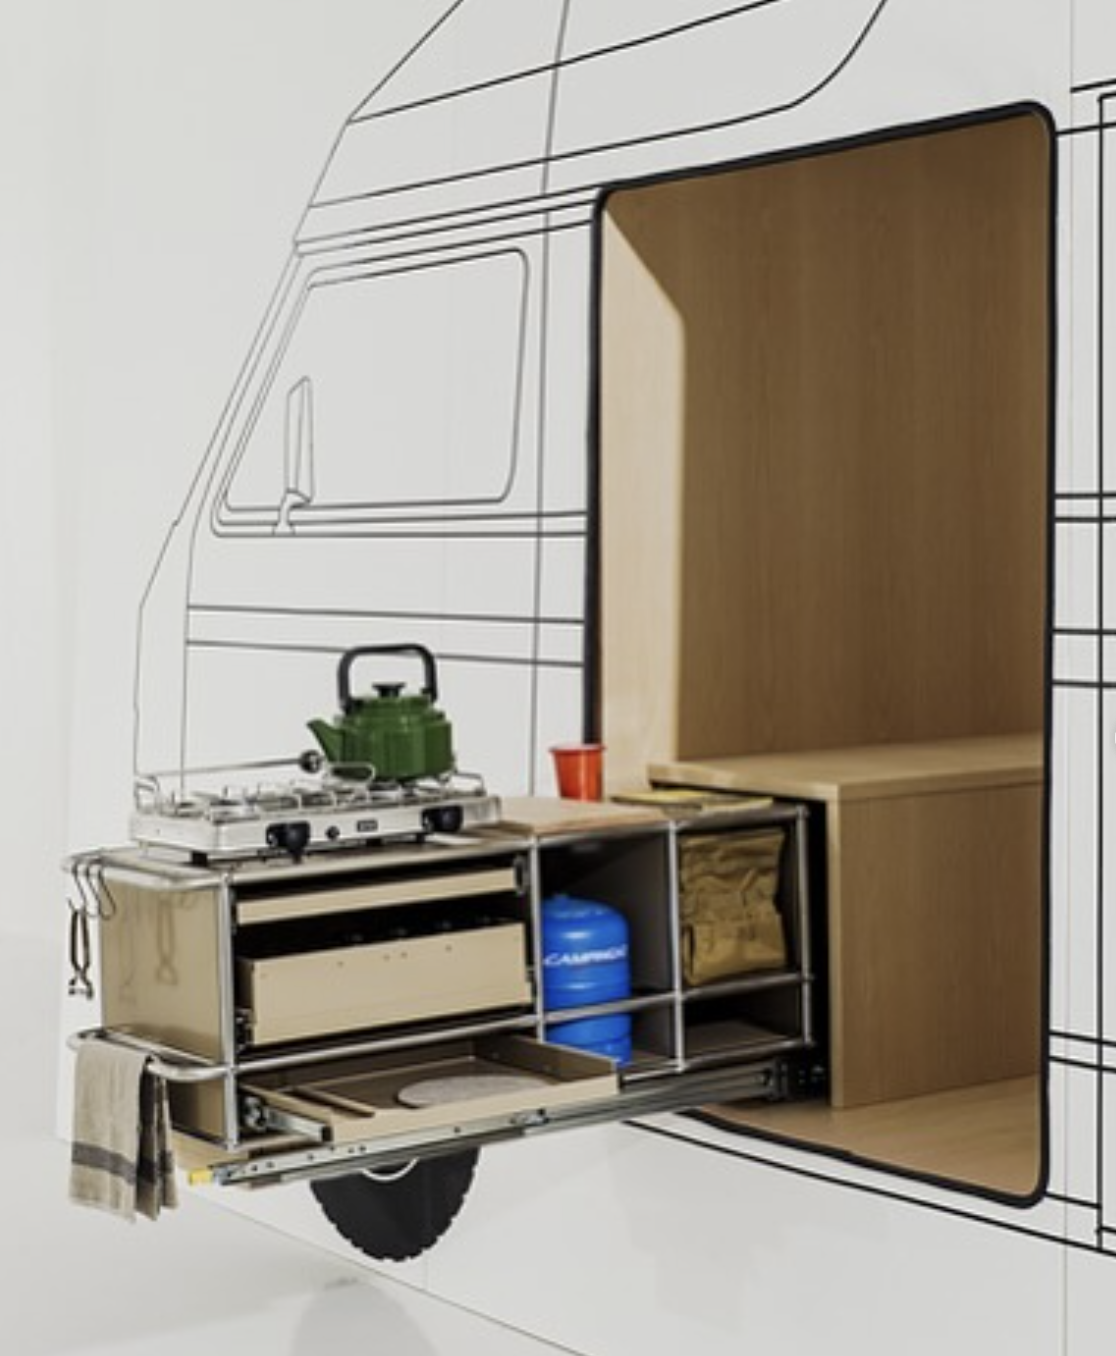
🔹 Sliding Kitchen Module – Allows outdoor cooking when the weather is nice
🔹 Stackable Storage Units – Can be rearranged depending on the trip
💡 Tip: Use 3D design software (e.g., SketchUp) to visualise your layout before building!
3. Insulating Your Modular Campervan
Good insulation is the foundation of a comfortable campervan build — and for modular conversions, it deserves special attention. Unlike fixed conversions where everything is built in once and left alone, a modular design means panels and walls may be accessed repeatedly. Getting insulation right at the start saves you significant rework later.
The goal is to control three things: heat retention, condensation, and sound. In the UK climate, all three matter.
Why Insulation Matters More in a Modular Build
In a standard fixed conversion, insulation is buried behind cladding and largely forgotten. In a modular build, you’re potentially removing furniture units, accessing floor space, and reconfiguring the interior — which means your insulation layer needs to be secure enough to stay in place through repeated loading and unloading.
The other key factor: vans are essentially metal boxes, and metal conducts heat and cold extremely efficiently. Without insulation, a UK winter trip becomes miserable quickly. More importantly, temperature differentials between the warm inside air and cold metal shell cause condensation — which, over time, leads to rust, mould, and damp.
Insulation Materials: Which to Use Where
| Material | R-value per 25mm | Best used for | Pros | Cons |
|---|---|---|---|---|
| PIR board (e.g. Celotex, Kingspan) | ~1.2 | Walls, ceiling, floor | High performance, rigid, easy to cut | Can leave gaps at edges |
| Sheep’s wool | ~0.7 | Walls, ceiling voids | Breathable, handles moisture well, UK-sourced | Bulkier per mm of performance |
| Spray foam | ~1.0 | Wheel arches, ribs, complex curves | Fills gaps completely, no vapour barrier needed | Difficult to remove later — not ideal for modular |
| Multifoil (e.g. Superquilt) | ~1.5–2.0 (claimed) | Secondary layer, ceiling | Thin profile, reflects radiant heat | Requires air gap to perform; some claims disputed |
| Acoustic foam / mass-loaded vinyl | Low thermal | Floor, bulkhead | Excellent sound deadening | Thermal performance minimal |
💡 Tip: For a modular build, PIR board paired with sheep’s wool in the voids is a popular UK combination — the PIR handles the flat panels, and the wool fills irregular gaps around ribs and framework without creating moisture problems.
Where to Insulate — and in What Order
1. Thermal/acoustic barrier (floor first)
Start with the floor. Use 6–12mm acoustic mat (Damplifier Pro or similar) directly on the bare metal to reduce road noise, then lay 25–50mm PIR board on top, cut to fit between floor ribs. Top with 9mm ply subfloor before laying any final flooring. In a modular build, the subfloor is permanent — even if the furniture above it isn’t.
2. Bulkhead
The bulkhead between cab and living area is a significant thermal weak point in most vans. Line it with 25mm PIR board, taping all edges with foil tape to prevent cold bridging. This is one of the most cost-effective insulation improvements you can make.
3. Walls
Cut PIR board to fit the flat sections between the van’s internal ribs and secure with grab adhesive. Fill the deeper rib channels with cut strips of PIR or packed sheep’s wool. Aim for a complete layer with no bare metal visible before cladding goes on.
4. Ceiling
The ceiling is often the trickiest — the curved profile of most vans means sheets need scoring or cutting into sections. Many builders use thinner (25mm) PIR on the ceiling for easier fitting, then add a multifoil layer before battening out for cladding.
5. Wheel arches and complex curves
These are hardest to cover with flat board. Spray foam works well here, or use cut sections of sheep’s wool packed tightly. Cover with a thin ply shell before cladding or carpet lining.
Vapour Barriers: Do You Need One?
This is a debated topic in the UK van conversion community. A traditional build approach uses a vapour barrier (foil-backed PIR essentially acts as one) to prevent warm, humid air reaching the cold metal. However:
- PIR board with properly taped joints acts as its own vapour barrier
- Sheep’s wool is moisture-buffering — it absorbs and releases without degrading
- In UK conditions, breathing walls (no vapour barrier, using hygroscopic materials) can perform as well as barrier systems
The approach to avoid: mixing vapour-open and vapour-closed materials without a clear strategy. If in doubt, use PIR throughout and tape all joints and edges with foil tape.
💡 Tip: However you insulate, make sure you have adequate ventilation — a roof vent (Dometic or Heki) will do more to prevent condensation buildup than any insulation material on its own.
Insulation for Modular Builds: Key Differences
🔹 Avoid spray foam in removable panels — if you ever need to remove a panel, spray foam makes that nearly impossible without damage. Use it only in permanent areas like the bulkhead and wheel arches.
🔹 Secure all insulation before modular units go in — once your track system or modular mounting points are in place, retrofitting insulation behind them becomes much harder.
🔹 Think about floor loading — modular furniture units need a solid, level subfloor. Get the floor build right before anything else.
3. Modular Electrical, Water & Gas Systems: Simplifying Setup & Flexibility
Many people worry that electrical, water, and gas systems are too complex for a modular camper build. However, with the right quick-connect systems and portable components, it’s easier than ever to make them semi-fixed or fully removable.
How to Build a Modular Electrical System
Instead of permanently wiring everything into the van, you can create a plug-and-play electrical system using quick-connect fittings and portable power stations.
🔌 Option 1: Semi-Fixed Electrical Setup
- A leisure battery is installed securely under the seat or in a removable battery box.
- Solar panels are roof-mounted, feeding into a charge controller connected to the battery.
- USB ports, lights, and 12V sockets remain wired in place, but the battery can be disconnected if needed.
🔌 Option 2: Fully Removable Electrical Setup
- Use a portable power station (e.g., EcoFlow, Jackery, or Bluetti) instead of a fixed leisure battery.
- Plug-in solar panels that fold away when not in use.
- 12V appliances (fridges, lights) connect via Anderson plugs, allowing easy disconnection when packing up.
💡 Tip: If you need extra power during the workweek, a dual-purpose inverter allows you to run tools from the same battery system used for camping.
How to Build a Modular Water System
A fixed water system is great for full-time van lifers, but a modular water system makes it easier to remove and store during winter or when the van is being used for other purposes.
🚰 Option 1: Semi-Fixed Water Setup
- A 20-30L fresh water tank is mounted inside the van.
- A 12V electric water pump is wired into the van but uses quick-connect plumbing fittings.
- A removable grey water tank is placed under the sink for easy disposal.
🚰 Option 2: Fully Removable Water Setup
- Use portable water jugs with a manual foot pump for the sink.
- Attach a clip-on outdoor shower system that can be stored when not in use.
- A collapsible sink and basin allow easy washing without built-in plumbing.
💡 Tip: Using quick-release hose fittings makes it easy to remove or swap water tanks.
How to Build a Modular Gas System
Instead of installing a permanent gas hookup, many DIY van builders in the UK use a modular gas setup for safety and convenience.
🔥 Option 1: Semi-Fixed Gas Setup
- A secured LPG gas bottle with a regulator and gas hose.
- A fixed 2-burner gas hob, but with quick-disconnect fittings so the gas bottle can be removed.
🔥 Option 2: Fully Removable Gas Setup
- Use a portable camping stove with disposable butane canisters.
- Store the stove in a dedicated pull-out kitchen drawer for easy access.
💡 Tip: A quick-connect gas system lets you attach or remove the gas bottle without tools, making it safer and easier to swap.
4. Installing the Electrical System
A reliable electrical system powers your lights, fridge, charging ports, and appliances.
Essential Electrical Components
✅ Leisure Battery (100Ah – 200Ah) – Powers everything when off-grid
✅ Solar Panels (100W – 400W) – Keeps your battery charged sustainably
✅ 12V Split Charge Relay – Charges the battery while driving
✅ Fuse Box & Wiring – Ensures electrical safety
✅ LED Lighting – Energy-efficient and low heat output
Basic Wiring Diagram
(for more on this read my Beginners Guide to Camper Electrics and my A Guide to Electrical Cable Sizing)
🔌 Solar Panels → Charge Controller → Leisure Battery
🔌 Alternator (via Split Charge Relay) → Leisure Battery
🔌 Battery → Fuse Box → Lights, USB Ports, Fridge, Water Pump
💡 Tip: If unsure, consult an auto electrician to check your setup before connecting!
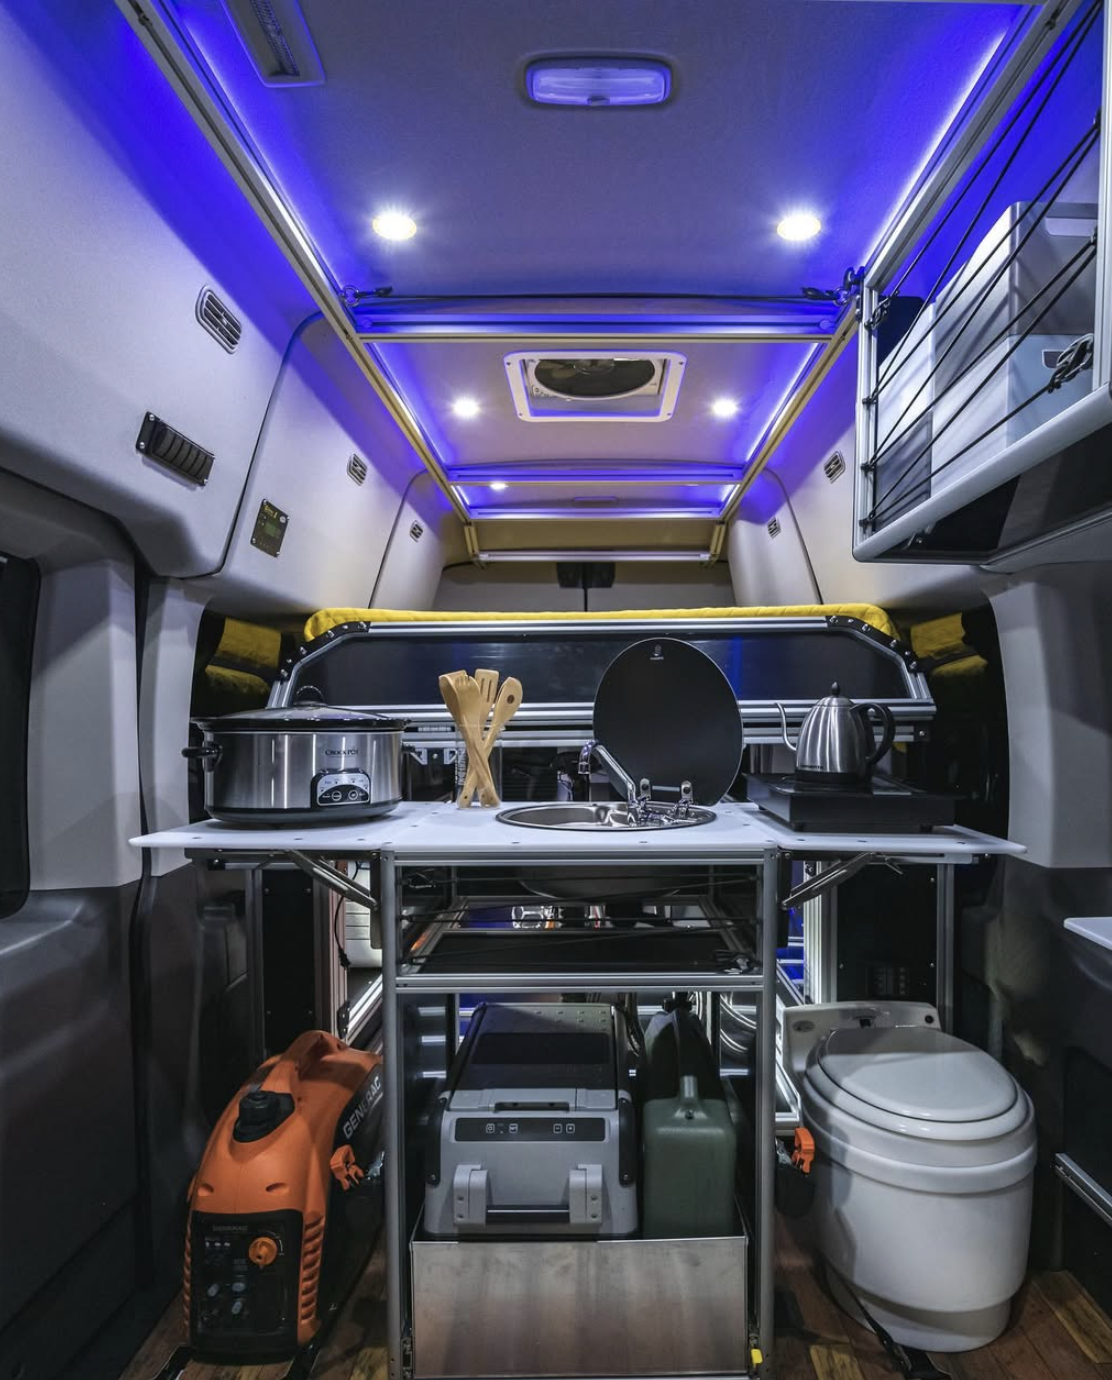
5. Plumbing & Water Systems
A simple modular water system allows for easy removal and winter storage.
Basic Setup for Campervan Water System
🚰 Fresh Water Tank (10-30L) → Sink with Pump → Grey Water Tank (Removable)
Optional Add-ons:
✅ 12V Water Pump – For pressurised water
✅ Outdoor Shower Setup – Heated via solar shower bag
✅ Portable Toilet (Thetford / Dometic) – Ideal for stealth camping
💡 Tip: Keep the system modular by using quick-release fittings for easy removal!
6. Building Modular Furniture & Storage
The right modular campervan furniture doesn’t just make your van comfortable — it makes the whole system work. Unlike fixed built-ins, modular furniture needs to be secure enough for driving, easy enough to remove in minutes, and versatile enough to serve multiple roles depending on whether you’re camping or working.
This section covers the main furniture components, how to mount them, which materials to use, and whether to build from scratch or buy off-the-shelf.
The Core Furniture Components
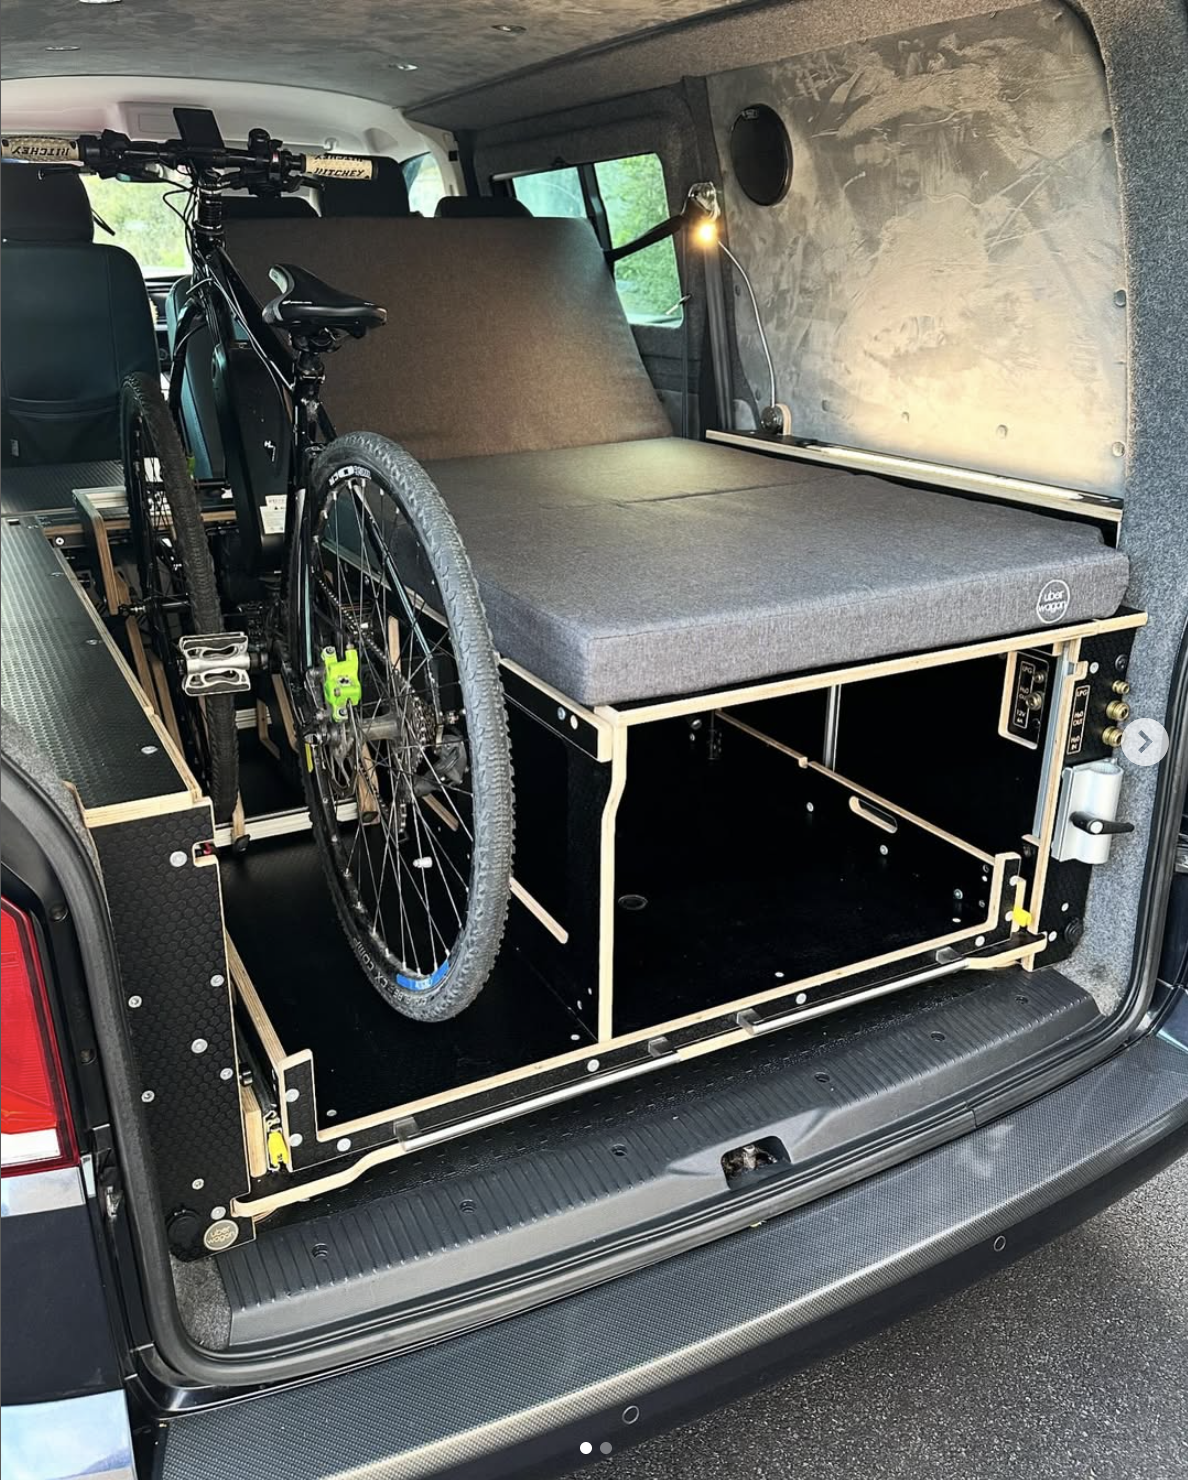
🔹 Bed pod / sleep platform — The anchor of any modular build. In a full-length van (LWB Sprinter or Transit), a fixed-height platform with storage underneath is the most space-efficient option. In a shorter van, a fold-flat or slide-out system that converts from bed to seating is worth the added complexity. Standard UK adult bed length is 190cm — verify your van’s internal length before committing to a design.
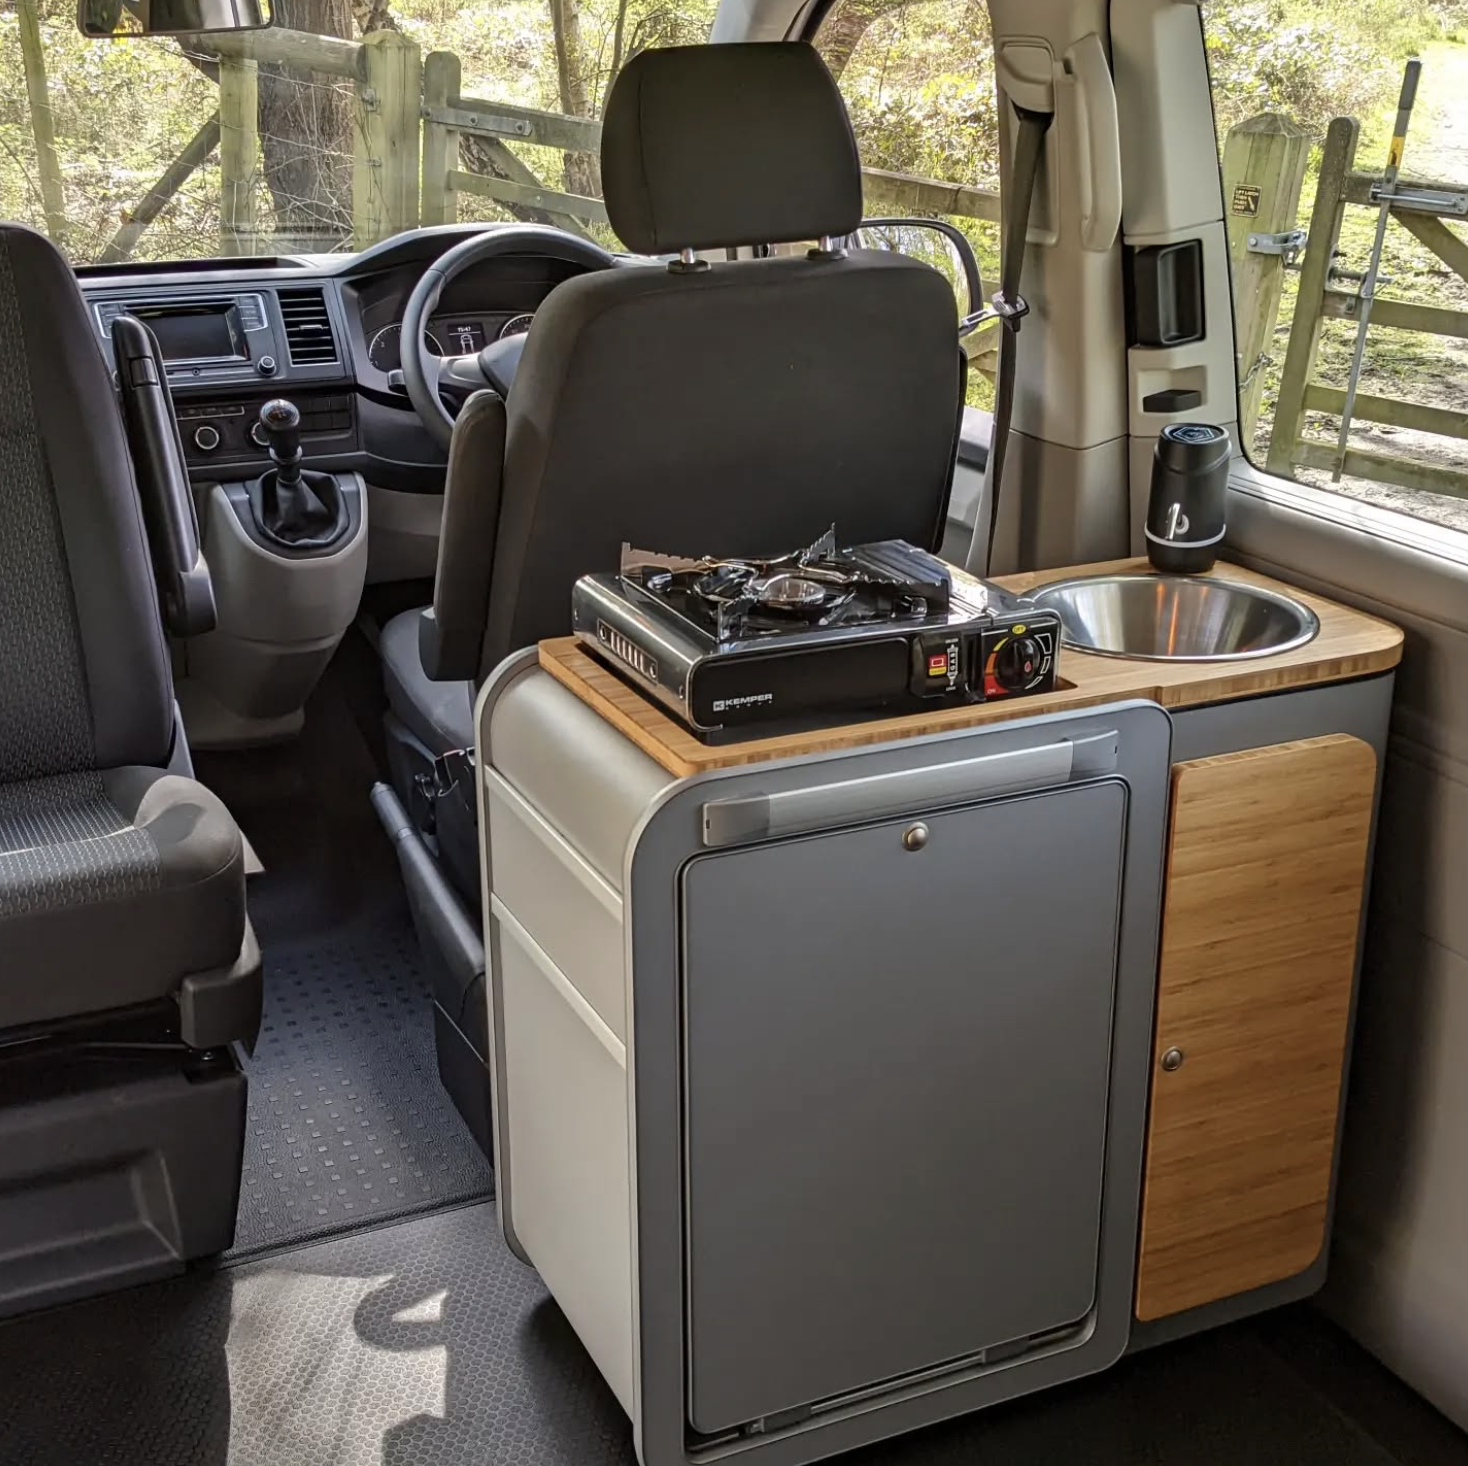
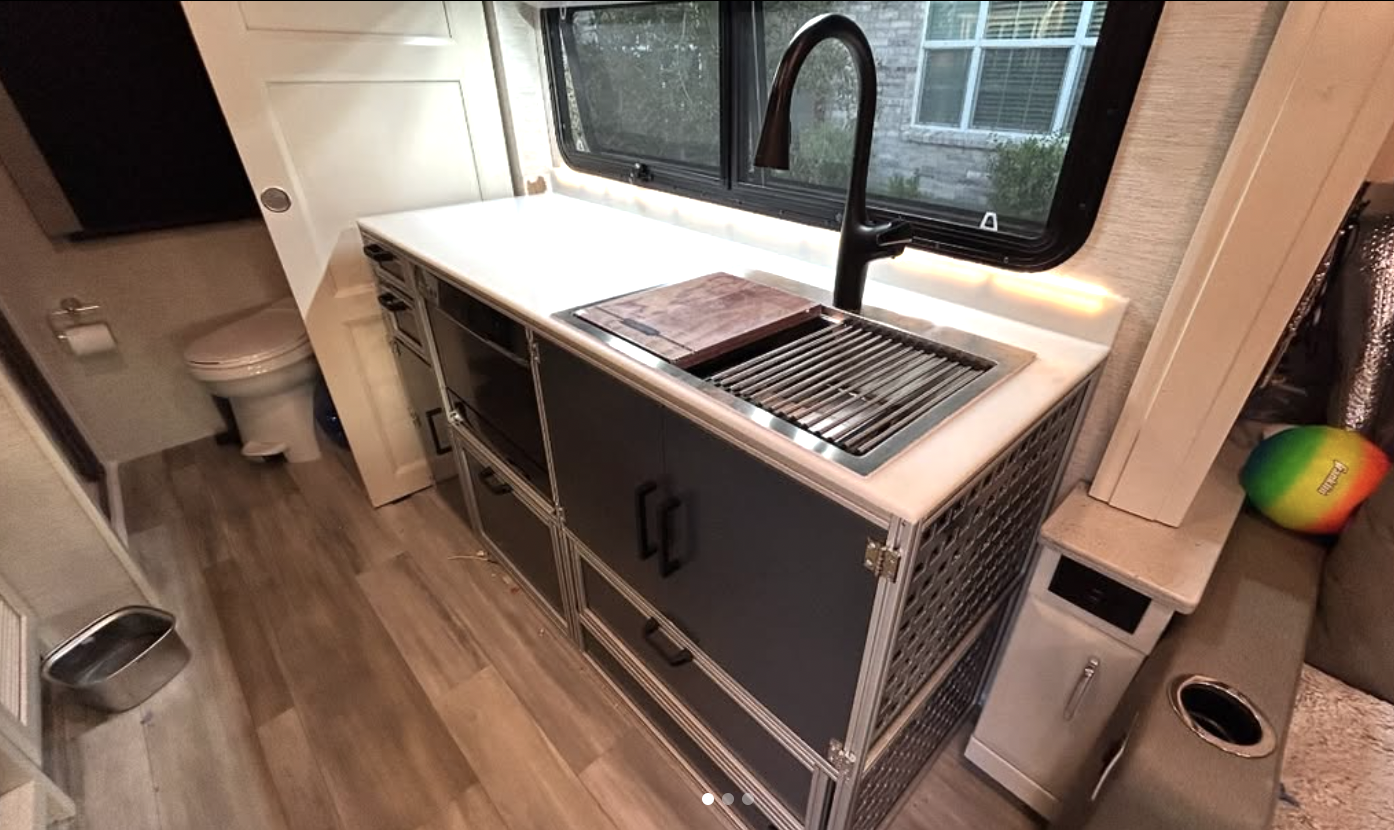
🔹 Modular kitchen unit — A self-contained kitchen pod with hob, worktop, and storage is the most popular modular furniture piece on the market. The best designs sit on castors for indoor or outdoor use, with a single water connection and a quick-release gas fitting. Brands like Vangear, Outback, and Bespoke Van Furniture offer off-the-shelf options; alternatively, a 600mm kitchen base unit from any flat-pack supplier can be adapted with the right fixings.
🔹 Under-bed storage drawers — The space under a bed platform is the most underused volume in most campervan builds. Full-extension drawer runners (rated to at least 30kg) allow the full depth of the van to be used for gear, clothing, and tools. In a modular build, these drawers can sit on a removable sub-frame rather than being fixed to the van floor.
🔹 Fold-down table and seating — A wall-mounted fold-down table takes up zero floor space when not in use. Pair with fold-flat bench seats or a pull-out unit from under the bed platform. IKEA’s NORBERG and KALLAX ranges are widely used as starting points in DIY modular builds.
🔹 Stackable storage boxes — Heavy-duty stackable cases (Peli, Zarges, or similar) double as seating, step platforms, and tool storage when the van is in work mode. A set of four uniform boxes stacked two-by-two can substitute for an entire wardrobe or overhead locker.
Mounting Systems: How to Secure Modular Furniture
The mounting system is what separates a genuinely modular build from furniture that just happens to be removable.
Aluminium L-track (also called airline track) is the most popular choice for UK van builds. It’s bolted to the floor and/or walls once, and every furniture unit attaches to it using cam buckle straps or lashing rings — no drilling required per item. It’s the same system used in commercial vehicle fit-outs and can handle significant loads.
T-nuts and wing bolts work well for lighter furniture mounted directly to a ply floor or wall panel. Pre-install the T-nuts when laying the subfloor; furniture can then be bolted down and removed tool-free.
Quick-release fasteners (quarter-turn or toggle-latch style) are useful for cabinet faces and removable panels where you need regular access but don’t want screws.
💡 Tip: Whatever mounting system you choose, apply it consistently across all your furniture units. Mix-and-match fixings means every removal job is a different puzzle — standardise early.
Best Materials for DIY Modular Campervan Furniture
| Material | Best for | Pros | Cons |
|---|---|---|---|
| 12mm birch ply | Structural panels, bed platform, drawer boxes | Strong, lightweight, takes screws cleanly | More expensive than MDF |
| 9mm marine ply | Anywhere with moisture exposure (kitchen, floor) | Water-resistant, durable | Heavier than birch ply at equivalent thickness |
| 18mm furniture board | Shelving, cabinet carcasses | Cheap, widely available, easy to cut | Heavy; not ideal for full van loads |
| Aluminium extrusion | Frame structures, track mounting, table legs | Lightweight, strong, rust-proof | Requires mitre saw or specialist cutting |
| MDF | Decorative panels, non-structural faces | Cheap, smooth finish | Not water-resistant; avoid near sink or floor |
💡 Tip: A full modular interior built from 12mm birch ply will typically weigh 40–70kg depending on the configuration. Keep a running weight tally as you build — staying under your van’s payload limit matters, especially if you’re also carrying tools and camping gear.
Off-the-Shelf vs DIY: Which Is Right for Your Build?
| Off-the-shelf modular system | DIY build | |
|---|---|---|
| Cost | Higher upfront (£500–£3,000+) | Lower if you have tools (£150–£800) |
| Time | Hours to fit | Days to weeks to build |
| Fit | Designed for specific van models | Can be made to exact measurements |
| Quality | Consistent, tested | Depends on skill level |
| Resale | Easier — brand name holds value | Harder to sell separately |
| Best for | Limited time, guaranteed result | Custom layouts, tight budgets |
For most people doing a first modular build, a hybrid approach works well: buy an off-the-shelf kitchen pod and bed system, then build your own storage around them. You get the precision-engineered pieces where it matters most, and save money on the elements where custom dimensions make more difference than brand quality.
8. How Much Does a Modular Campervan Conversion Cost?
Budget Guide: How Much Does a DIY Modular Campervan Conversion Cost?
One of the most searched questions in the van conversion world is: how much does it actually cost? The honest answer is that it varies widely — but a modular build has some genuine cost advantages over a fixed conversion that are worth understanding.
The main saving is flexibility: you don’t have to buy everything at once. A modular system lets you start with a bed and basic power setup, then add a kitchen unit, water system, and storage as budget allows. You’re also not locked into bespoke joinery — modular furniture systems can be bought off-the-shelf, assembled, and upgraded or replaced without rebuilding the whole interior.
DIY Modular Campervan Cost Breakdown (UK, 2024)
These figures assume a DIY build where you’re supplying labour. Professional labour costs would add roughly £50–£80/hour on top.
| Category | Budget build | Mid-range | Higher spec |
|---|---|---|---|
| Insulation (PIR + sheep’s wool) | £150–£250 | £300–£450 | £500+ |
| Cladding & flooring | £200–£350 | £400–£600 | £700+ |
| Modular bed/furniture system | £300–£600 | £700–£1,200 | £1,500–£3,000+ |
| Electrical (leisure battery + solar) | £400–£600 | £700–£1,000 | £1,200–£2,500+ |
| Water system | £80–£150 | £200–£350 | £400–£700+ |
| Lighting | £50–£100 | £120–£200 | £250+ |
| Gas setup | £80–£150 | £150–£250 | £300+ |
| Roof vent (Dometic/Heki) | £150–£250 | £280–£380 | £400+ |
| Miscellaneous (fixings, tape, etc.) | £100–£150 | £150–£250 | £300+ |
| Total (van excluded) | £1,500–£2,500 | £3,000–£4,700 | £5,500–£10,000+ |
Where a Modular Build Saves Money vs Fixed
🔹 No bespoke joinery — pre-built modular pods (Vangear, Outback, Bespoke Van) can be significantly cheaper than custom-built fitted furniture.
🔹 Phased spending — build in stages rather than committing a large sum upfront. Start with bed and electrics; add kitchen and water later.
🔹 No professional fitting costs — most modular systems are designed for self-installation. No van conversion specialist required.
🔹 Better resale — a van with removable modular furniture can be sold without the conversion, widening your buyer pool and protecting the van’s value.
Where NOT to Cut Corners
🚫 Electrical safety — undersized cable, poor fusing, and DIY lithium battery setups cause van fires. If you’re unsure, spend the money on an auto electrician to check your setup.
🚫 Insulation — skimping here leads to condensation, damp, and mould — expensive to fix later.
🚫 Bed fixings — if your modular bed unit isn’t properly secured, it becomes a hazard while driving. Use appropriate load-rated fixings and test them before your first trip.
Budget Tips for UK Van Converters
💡 Buy second-hand where possible — leisure batteries, solar panels, and water pumps are frequently listed on Facebook Marketplace and eBay from completed builds being updated or sold. Quality varies, so inspect carefully.
💡 Join UK van conversion groups — communities like the Van Conversion Community UK (Facebook) and forums like VanDOit share material recommendations, supplier discounts, and build guides specific to the UK market.
💡 Buy timber from a local merchant, not a DIY chain — sheet materials (ply, MDF) are significantly cheaper from a trade timber yard than B&Q or Wickes, and you can often get off-cuts for modular shelf and drawer components at low or no cost.
💡 Don’t buy your van at the same time as your build budget — depreciation on a panel van is fast. Work out your full build cost first, then factor the van purchase separately so you don’t run short mid-build.Share
9. Legal Considerations & Insurance in the UK
To register your campervan with the DVLA, it must meet specific requirements.
DVLA Campervan Classification Requirements
✅ Fixed Bed or Seating Area
✅ Cooking Facilities
✅ Storage Space
✅ Windows & Ventilation
🚐 Insurance – Specialist campervan insurance providers include Adrian Flux, Just Kampers, and Comfort Insurance.
💡 Tip: Check if your van qualifies for “motor caravan” status to get lower road tax!
Why a Modular System Makes Life Easier
- Simplifies installation – No need for professional wiring or plumbing.
- Easier maintenance – Components can be removed and repaired individually.
- Flexibility – Switch between a camper setup and an empty cargo van in minutes.
- Better resale value – A van without fixed installations can be sold to a broader market.
By using clever quick-connect fittings and portable power sources, even complex systems like electrics, water, and gas can be designed in a way that’s easy to remove, upgrade, or repositio
1. Quick-Connect Gas Fittings:
- LPG Shop: Specializes in quick-release gas connectors ideal for campervans and motorhomes. Their range includes external quick-release gas points for BBQs and high-pressure quick-release connectors. lpgshop.co.uk
- Gas Equipment Direct: Offers a variety of propane gas fittings, including quick-release couplings suitable for 8mm hoses, making them ideal for modular gas systems in campervans. Gas Equipment Direct+1lpgshop.co.uk+1
- I Gas Direct: Provides a comprehensive selection of LPG fittings, from copper compression fittings to gas hose fittings, suitable for creating flexible gas systems in campervans. igasdirect.co.uk+1Gas Equipment Direct+1
2. Removable Water Tanks and Fittings:
- Tanks Direct: Supplies a range of water tank fittings, including outlets, couplers, and tank connectors, essential for setting up modular water systems in campervans. directwatertanks.co.uk
- Direct Water Tanks: Offers IBC fittings and tank-to-tank connectors, which can be utilized to create adaptable water storage solutions in your campervan. directwatertanks.co.uk
- Northern Tank Store: Provides various water tank fittings, such as hose clamps and valves, aiding in the customization of your campervan’s water system. northerntankstore.co.uk
3. Portable Power Stations:
- EcoFlow: Known for their range of portable power stations, EcoFlow products are suitable for campervan setups, offering reliable off-grid power solutions.
- Jackery: Offers portable power stations and solar generators that are popular among campervan enthusiasts for their ease of use and reliability.
- Bluetti: Provides high-capacity portable power stations suitable for extended off-grid stays, ensuring your campervan’s electrical needs are met.
Final Thoughts: The Future of Modular Campervans
With more people needing multi-use vehicles, modular campervans are becoming the best solution for those who want both work and leisure in one van.
By designing modular electrical, water, and gas systems, you can make your van:
✅ More versatile
✅ Easier to modify
✅ Cheaper to maintain
✅ Perfect for both work and adventure
With the right quick-connect fittings, removable furniture, and flexible layouts, building a DIY modular campervan has never been easier! 🚐✨
When designing your modular campervan systems, ensure that all components are compatible and meet safety standards. Consulting with professionals or experienced DIYers can provide additional insights tailored to your specific needs.


Recent Comments