
Campervan conversions give you the freedom of the open road with the comforts of home – but only if your campervan electrics are planned properly.
This beginner-friendly guide explains a basic campervan electrical system step by step. It’s written from over 30 years of converting vans into liveable campers, and is aimed at anyone who’s thinking:
- “Where do I begin with my camper van’s electrical system?”
- “What’s the simplest, safest way to wire my van electrics?”
We’ll cover the core parts of a 12V campervan electrics setup, plus options for solar and 240V mains.
12V System Basics: The Heart of Power
Alternator and Isolator: Keeping the Power Flowing
Deep-Cycle Leisure Batteries: The Powerhouse
Solar Power: Harnessing Free Energy
Earthing & Isolation: Safety First
Control Panel and Fuses: Managing the Electrical Flow
240V Mains Connection: Introducing Shore Power
Integrated 240v
Where to Begin When Designing Your Camper Van’s Electrical System
Before you buy anything, get clear on how you’ll use your van. That will shape your camper van electrical system from day one.
1. List your electrical loads
Write down everything you want to power:
- Lights (LED spots/strips)
- Fridge or cool box
- Water pump
- Diesel heater
- Fans and roof vents
- Phone / laptop charging
- Any 240V kit (kettle, induction hob, etc.)
2. Estimate how you camp
- Off-grid for several days at a time?
- Mostly on campsites with hook-up?
- A mix of both?
The more you’re off-grid, the more you’ll rely on 12V campervan electrics (batteries + solar) rather than shore power.
3. Sketch a simple van electrical system
At a basic level a simple van electrical system looks like this:
Alternator → DC‑DC charger → Leisure battery → Fuses / distribution → Your 12V circuits
(Optionally add: Solar → MPPT → Leisure battery and/or 240V mains → charger/inverter)
Even a rough sketch now will stop you wasting money on the wrong kit later.
12V Campervan Electrics: The Heart of Your Power System
Nearly all camper van electrics are built around a 12V system, similar to a car.
Your 12V campervan electrical system:
- Stores energy in one or more leisure batteries
- Feeds that power through fuses and a distribution block
- Powers low‑draw essentials such as lights, USB sockets, fans and pumps
The key difference from a normal car is that a campervan needs to power living space loads for hours or days without flattening the starter battery. That’s why you add a separate van leisure battery (or bank of batteries).
At its most basic:
- The cab starter battery still starts the engine
- A leisure battery in the back runs your living area
- A DC‑DC charger connects the two and charges the leisure battery safely while driving
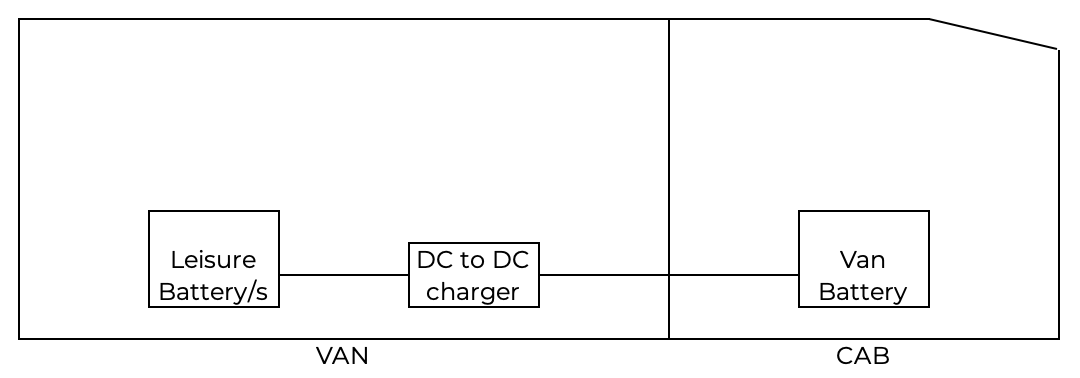
Alternator & DC‑DC Charger : Keeping the Power Flowing
Your alternator charges the starter battery while you drive. In a campervan, you also want it to charge the leisure batteries – but safely, without overloading anything or risking the starter going flat.
This is where a DC‑DC charger (battery‑to‑battery charger) comes in.
Why use a DC‑DC charger (instead of a simple split-charge relay)?
- Modern vehicles often have smart alternators that don’t play nicely with old‑school split relays
- A DC‑DC charger gives the leisure battery the right charging profile (especially important for lithium)
- It acts as an intelligent isolator between starter and leisure batteries
Top tip: Don’t scrimp on the DC‑DC charger. There’s no real upgrade path here and it’s not the biggest cost in your campervan electrical system. A quality unit (e.g. from Victron) will treat your batteries properly for years. This Victron is the one I’d go for (here).
Deep-Cycle Leisure Batteries: The Powerhouse of Your Campervan Electrical System
Leisure batteries (also called deep‑cycle batteries) are designed to be discharged and recharged over and over – perfect for campervans.
Key points:
- Capacity is measured in amp‑hours (Ah)
- More Ah = more usable energy between charges
- Different chemistries (lead‑acid, AGM, lithium) have different costs, weights and usable capacity
When choosing a battery bank:
- Think about how long you want to last off‑grid without solar or driving
- Allow for a safety buffer; most beginners underestimate their usage
- Remember that with lead‑acid you only want to use around 50% of the rated Ah regularly
Cost and weight can be deciding factors. The good news: it’s fairly easy to upgrade batteries later, as long as your wiring and charging gear are sized for it.
Top tip:
Start with a cheap or even used battery while you’re building and testing. Early on you’ll abuse the battery a bit. Plan your wiring and chargers so you can later upgrade to a better or bigger battery bank without ripping everything out.
Recommended leisure batteries: Basic (Alpha Batteries 110 Ah leisure battery); better (Ecoworthy 100Ah LiPo battery); best (Roamer 100Ah LiPo battery).
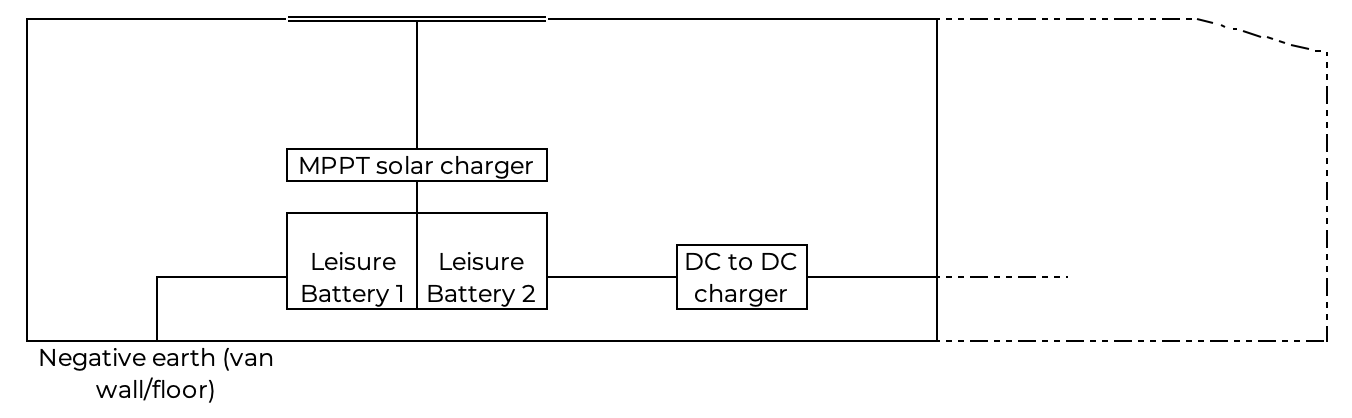
Solar Power: Harnessing Free Energy for Your Campervan Electrics
If you want true freedom from campsites, solar is your best friend.
A basic campervan solar setup looks like this:
Solar panel(s) → Roof gland → MPPT solar charge controller → Leisure battery
Key components:
- Solar panels – fixed to the roof or roof rack
- Cabling and roof gland – to bring the cables into the van
- MPPT solar charge controller – optimises power from the panels and charges the battery safely
The size of the MPPT is based on both:
- Total solar wattage (W)
- Battery bank and system voltage (usually 12V in a basic campervan electrics setup)
Quick sizing rule of thumb for MPPT
- Aim for MPPT current rating around 10–20% of your battery bank’s Ah capacity
- Current (amps) ≈ panel watts ÷ system voltage
- e.g. 170W panel on a 12V system → about 14A, so pick a controller comfortably above that
Top tips for simple campervan electrics with solar:
Panel bargains: many trade suppliers sell cosmetically damaged panels at a big discount. Cosmetic damage doesn’t matter on a van roof.
Go for a reputable MPPT brand (again, Victron is a solid shout) – this is a key piece of your camper van electrical system.
Top tips: If you’re able to get to Bimble Solar (or any other trade provider) buy a damaged panel (here’s a link to their clearance section). These are often only cosmetic damages to the frame, and as the panel is unlikely to be seen you can grab a great bargain.
To size your MPPT controller it should be rated for between 10 to 20% of the full battery bank capacity in amp-hours. Dividing the power in watts by the voltage will give you the exact current in amps. So a 170w panel in a 12v system would mean 14amps is the sizing parameter for your MPPT charge controller (i.e. this lovely blue and inexpensive Victron bit of kit)
Earthing & Isolation: Safety First in Any Van Electrical System
Once you’ve created a separate 12V system in the back, you must earth it properly and ensure it can be isolated.
Earthing your campervan electrics
- Find a solid point on the van body close to your electrical board
- Grind back to bare metal
- Use an appropriate bolt, star washer and corrosion protection
- Ensure it can’t work loose behind your interior build
Isolating and protecting your power sources
Use breakers or heavy‑duty fuses on every major connection:
- Between starter battery and DC‑DC charger
- Between DC‑DC charger and leisure battery
- Between solar panels and MPPT, and between MPPT and leisure battery
- On the main feed from the leisure battery into your distribution/fuse block
Top tip:
Go for quality marine‑grade breakers (e.g. Blue Sea style). Cheap square trip breakers from unknown brands are often unreliable.
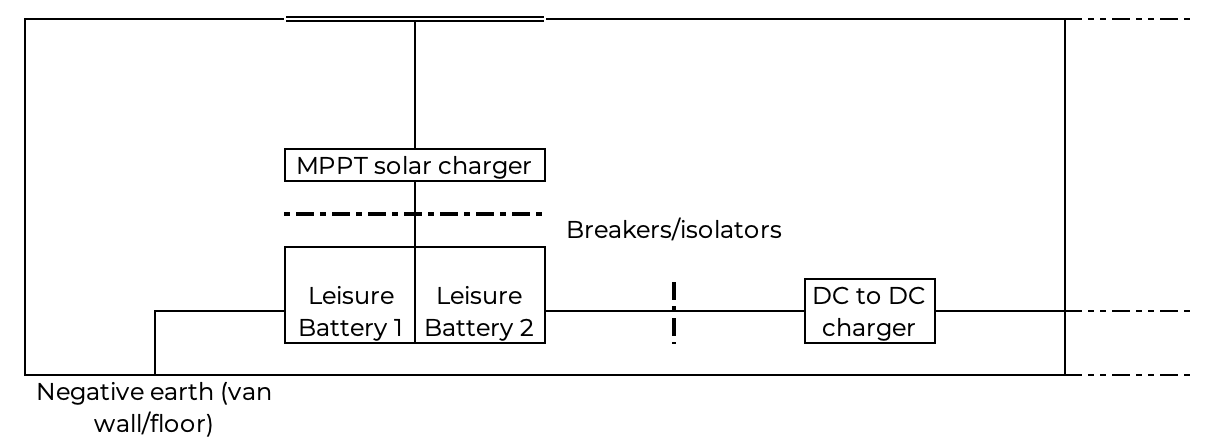
Top tip: A lot of people suggest that the square trip fused breakers are worth avoiding but if you go for a brand like Bluesea you’ll be safe.
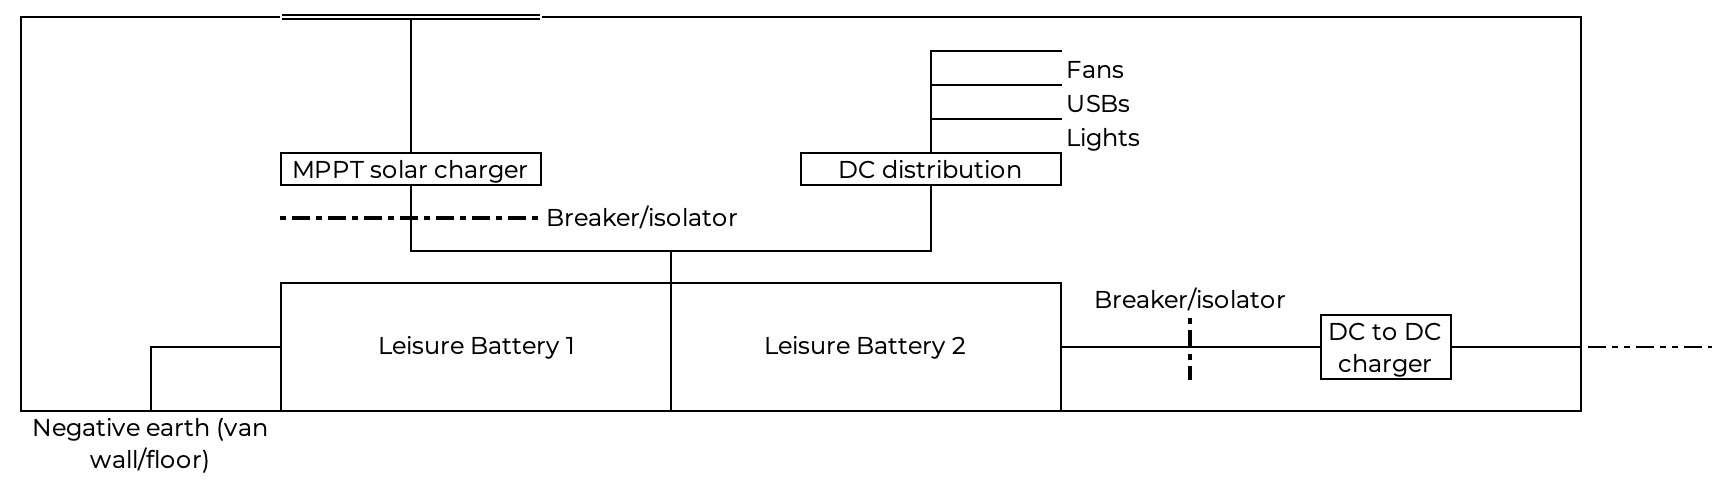
Control Panel, Fuses & Wiring : Managing the Flow in Your Campervan Electrical System
A well‑laid‑out van electrical system makes life easier to use and to troubleshoot.
Control panel
Your panel or board usually includes:
- Main battery voltage display or monitor
- Switches for key circuits (lights, water pump, fridge, etc.)
- Fuse or breaker access
Fuses and distribution
Fuses are crucial in camper electrics because they:
- Protect your cables and devices from overloads
- Localise problems – one blown fuse instead of a melted loom
Basic approach:
- Run a main positive feed from your leisure battery to a 12V distribution block
- From that block, run individual circuits to each device or group of devices
- Size each fuse slightly above the expected current draw of that circuit and below the current‑carrying capacity of the cable
240V Mains Hook‑Up: Adding Shore Power to Your Campervan Electrics
Your 12V campervan electrical system is perfect for everyday off‑grid living. But some devices are better on mains:
- Induction hobs
- Air conditioning
- Standard kettles, hairdryers, or other high‑wattage items
To run these, you introduce 240V mains (shore power).
A simple shore‑power‑only setup might look like:
External 240V inlet → Consumer unit (RCD + breakers) → 240V sockets
This kind of system is isolated from the 12V side; you only have 240V when plugged into a campsite or generator.
Benefits:
- Fast laptop and device charging with normal chargers
- Ability to use normal household sockets on hookup
- Extra safety via RCD and correct earthing when installed properly
Integrating 240V with a Charger/Inverter
Most modern campervan electrical systems aim to have 240V even when off‑grid. That’s where a combined charger/inverter comes in.
Typical layout:
- 240V in from campsite → charger/inverter → van’s 240V sockets
- 12V in from leisure battery → inverter section → same 240V sockets when off‑grid
Advantages:
- One smart box handles charging your leisure batteries and providing 240V
- Your sockets work the same whether you’re on hook‑up or parked in the wild
But there’s a big warning:
Running heavy 240V loads off your inverter can drain your leisure batteries very quickly.
Keep your simple campervan electrics mindset: only power what you realistically need, and design your system around your batteries and solar, not the other way round.

Choosing the Right Components for Safe, Efficient Campervan Electrics
Getting the details right makes your system safer and more efficient.
Wire gauge (cable size)
- Must be sized for the current and the run length
- Undersized cable can overheat and is a fire risk
- Use decent‑quality automotive or marine cable, not random household flex for 12V runs
Fuses & breakers
- Every major positive feed should be fused or on a breaker, as close to the power source as practical
- Rate the fuse to protect the cable, not just the device
Chargers & regulators
- DC‑DC charger for alternator charging
- MPPT for solar
- Mains battery charger or inverter/charger for shore power
Together, these form the brain of your campervan electrical system UK setup, keeping your batteries healthy.
Lighting
- Go LED wherever possible
- Low power draw, cool running and long life – ideal for basic campervan electrics and off‑grid use
Installation & Safety: When to DIY Your Campervan Electrics
Many people successfully build a simple campervan electrical system themselves, but you must respect the risks.
Good DIY practices:
- Route cables away from sharp edges, moving parts and heat sources
- Use grommets where cables pass through metal
- Secure cables with clips or conduit so they can’t rub or rattle loose
- Use proper crimp connectors and a good crimping tool (or solder where appropriate)
- Label both ends of every major cable and all fuses/breakers
Get professional help if:
- You’re not confident working with 240V
- You’re unsure about earthing and RCDs
- You’re building a more complex lithium / high‑power system
Regularly inspect your system for loose connections, corrosion or damage. Fix small issues early before they become big problems.
From Basic Campervan Electrics to Advanced Systems
Once you’ve understood and maybe built a simple van electrical system, you can start to get more advanced.
A popular next step is to build the whole system on a removable electrics board:
- Mount the DC‑DC charger, MPPT, breakers, bus bars, fuse blocks and monitor on a single board
- Pre‑wire as much as possible on the bench
- Install it as one unit in the van
- Only connect:
- Battery feeds in
- Solar feeds in
- 12V and 240V circuits out
I’ve done this in my own builds (including my LT, Walt), and it makes installation, upgrading and fault‑finding much easier.
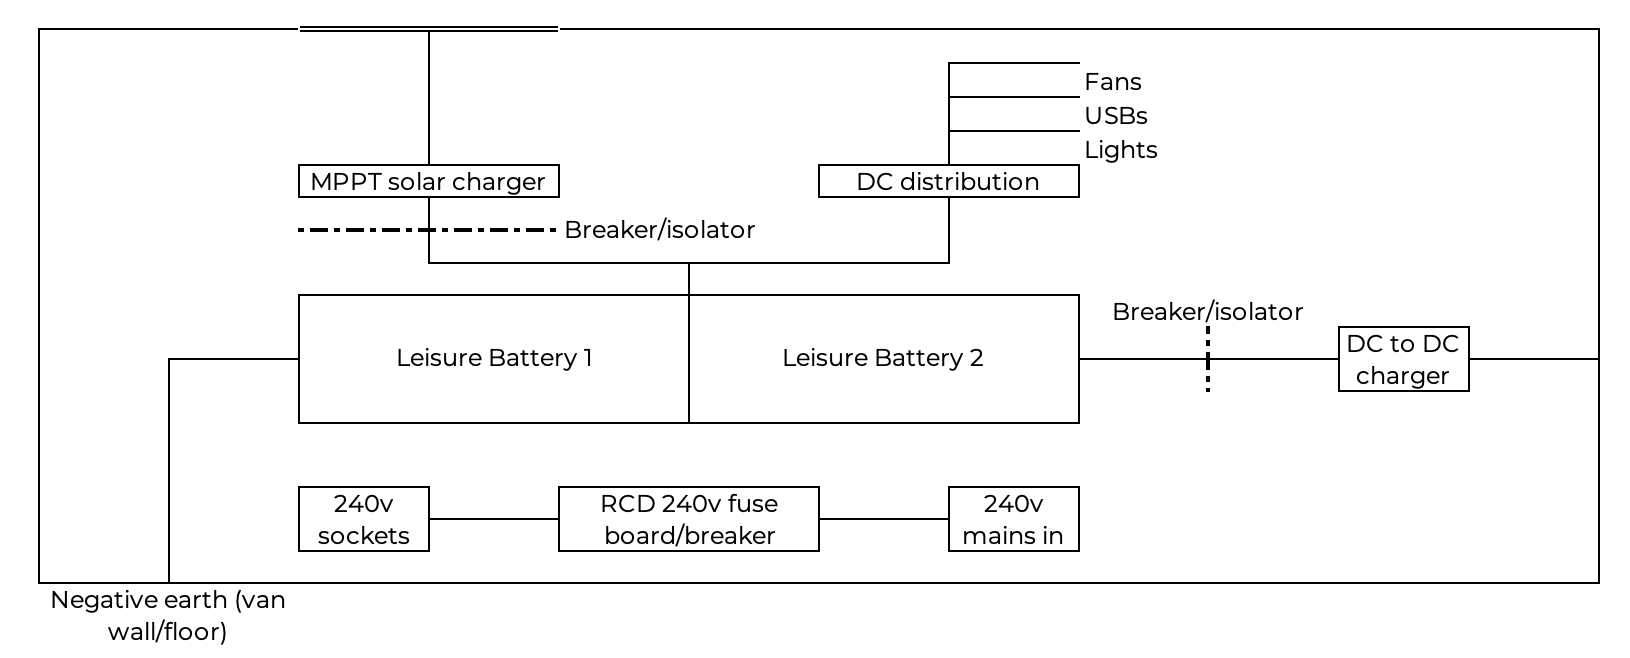
Eventually you’ll be able to draw up schematics like the below, and then build removable electrics boards like this:
 |  |
Conclusion: Campervan Electrics Don’t Have to Be Complicated
Campervan electrics explained in one line:
Separate starter and leisure batteries, charge them safely, protect every circuit, and size your cables and fuses correctly.
Start with a basic campervan electrics setup that matches how you actually travel. You can always expand with more battery, more solar, or a smarter charger/inverter once you’ve lived with the van for a while.
Looking for something a little more advanced?
Then, when you get a bit more proficient you can do things like build your whole electric system on an external board to then be taken in and mounted in the van with just the battery feed in and the external accessories feeds out to connect. I did this in Walt as you can see in this video…
Want more on electrics?
– Sizing Your Campervan’s Battery Capacity and Solar Array
– A Guide to Electrical Cable Sizing


Recent Comments